Archive for December, 2006|Monthly archive page
Create Triple DES SecretKey in Java
 Comments (17)
For a project at work, I needed to integrate our website with another web application. The web application in question also had their own built in user management system. For seamless integration we wanted our users to only have to log in once.
As the web application was quite a large application, they already had a REST api that allowed you to supply them with a encrypted token in the url that authenticated you on their systems. You simply had to encrypt the user id (on their system) and the current time stamp.
As I had never done anything to do with encryption before in Java. I had to learn from scratch.
The token had to be encrypted with Triple DES CBC scheme. They supply you with an access key. Here is where the problem lay. I could find quite a few examples that allowed you to use the inbuilt key generator in Java, but what about if you have your own key (our access key). This was a bit more difficult to find, so I thought I would blog a code snipit here. In the end it turned out to simple (it always is 🙂
The key needed to be Triple DES (DESede)
String keyString ="4d89g13j4j91j27c582ji69373y788r6"; // I made this key up by the way!
byte[] keyB = new byte[24]; // a Triple DES key is a byte[24] array
for (int i = 0; i < keyString.length() && i < keyB.length; i++) {

keyB[i] = (byte) keyString.charAt(i);

}
// Make the Key

SecretKey key = new SecretKeySpec(keyB, "DESede");
A good resource that I found was here :
Hamza
Atheros Wireless Setup – Ubuntu
As I stated earlier, I just bought a new laptop and installed Ubuntu 6.10 (Edgy Eft) on it. All was working apart from the wireless connection. The Laptop comes with a Atheros wireless card. Ubuntu also comes installed with madwifi drivers for the card. So in theory things should just work, right ? Well no. The version of the wireless card I have (I do not have the version to hand) does not work with the current ubuntu package of madWiFi drivers.
So this is a quick step by step tutorial on how I got things to work nicely :
- Get the g++ compiler : sudo apt-get install build-essential
- Download subversion : sudo apt-get install subversion
- Create directory to store the drivers and navigate to it.
- Download latest madwifi drivers using subversion : subversion svn checkout http://svn.madwifi.org/trunk madwifi
- Get the current Kernel you are running : uname -r
- Navigate to the correct lib directory : cd /lib/modules/$(uname -r) (use the output from the previous step to get the directory)
- Delete the net lib files : sudo rm -rf net
- Delete the madwifi files : sudo rm -rf madwifi
- Delete this folder if it exists : sudo rm -rf madwifi-ng
- Find the modules currently installed that you need to unload : lsmod | grep ath
- From this output above issue a rmmod command for all the modules : sudo rmmod modulename
- Go back to where you downloaded the new subversion drivers and run : sudo make and then sudo make install answer yes to remove the old module.
- Load all of the modules you have just unloaded using modprobe. These should be:
sudo modprobe ath_pci
sudo modprobe ath_rate_sample
sudo modprobe wlan
sudo modprobe ath_hal - Check to see if modules have been loaded by typing dmesg and looking at the system log.
- Open up network gui in Ubuntu and enable the wifi card and set the sessid
The card should now be configured. However if you want a dock applet that informs you how much strength your wireless card has, I would suggest netapplet.
I hope this has helped someone. This took me about 2-3 hours to get working!
Hamza
PC Nextday Zoostorm 4-5701 17″ Laptop – Wireless problem
So I bought a 17″ Zoostorm laptop from PCNextday . It got 5 stars out of 5 from Computer Shopper and it worked out about £200 cheaper the a 17″ Dell laptop.
All was well, I was aware that they did have a bad reputation for customer service, but I thought I would risk it as the saving was too much.
The laptop came within 3 days of me ordering it. This was a surprise as they said that it can take up to take 3 weeks.
The laptop was working well, I was impressed with the screen (even though computer shopper said it was dull). However I was having a problem with the built in wireless card (Atheros). It was getting a very low signal even though I was sitting next to the wireless router. I first thought this was my router, so I asked someone else to test it and they reported the same problems. I then went and upgraded the software to the latest driver. The windows drivers are difficult to find so here is a good resource. But this had no effect. So after tearing my hair out I could not figure it out I emailed the technical support at pcnextday. They took a long time to respond, but their response was worth the wait. They basically said to check weather the wireless card was installed correctly and gave me these pictures :

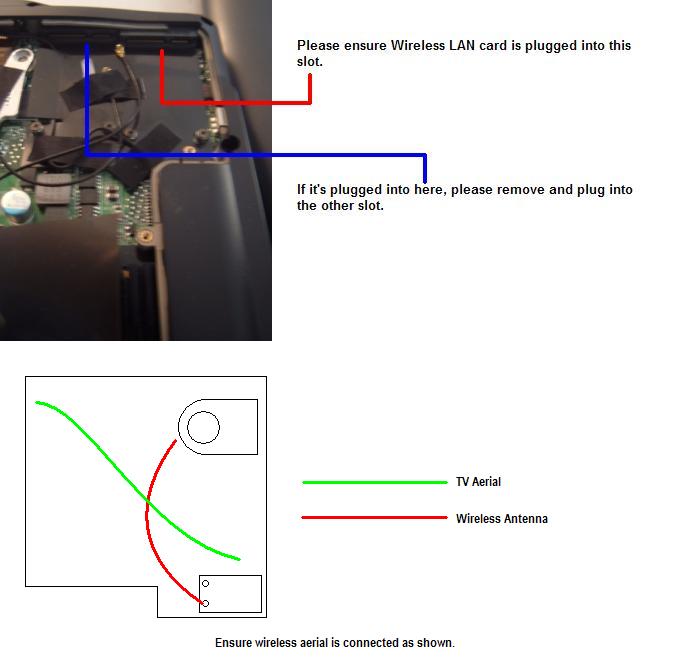
So I unscrewed the laptop and checked it. I found out that the card was in the correct place, however the antenna was connected to the wrong point in the card. So I changed that and tested it. Unfortunately this did not work. As there were two wires that were black, I thought maybe the person who installed it made a mistake and attached the wrong wire. So I added the other wire and it worked. Now I have an excellent signal 🙂
I hope this experience helps someone. I think pcnextday need to work on their quality control 🙂
I have installed Ubuntu 6.10 on the laptop. All of the things seem to work. I had to do some configuration to get the wireless card to work though, but that is another blog post.
Hamza
